Sunday, September 4, 2011

How to Remove OpenCloud Security (Uninstall Guide)

OpenCloud Security is a rogue malware scanner. It displays fake security alerts that say your computer is infected with viruses and offers to clean your computer of supposedly infected files. If you proceed with the offer, you will lose your money and give your credit card details to cyber criminals. Basically, it misleads users into paying for completely useless software. Needless to say, it can be an upsetting experience. Although, the name of this fake anti-virus program may sound legitimate, OpenCloud Security is nothing more but a scam. Very often malware authors rely on social engineering to defeat operating system security. Malware also distributed through the use of fake online virus scanners, drive-by downloads, software exploits and infected websites.

Good anti-virus software, firewalls will protect your computer against many threats, but they cannot detect all malware, especially new rogue programs, because sometimes, it can be difficult to tell whether it's a poorly coded program or scareware. Use common sense, don't rely solely on your antivirus software no matter how good you think it is. If you think that something fishy is going, scan your computer with at least two anti-malware programs and of course, update your antivirus software and run a full system scan. If your computer is infected with OpenCloud Security, please follow the removal instructions below. Although, it can't delete your files, steal sensitive information, you should still remove OpenCloud Security because it may download additional malware onto your computer, for example backdoor trojans, spyware or adware.


Rogue antivirus programs might perform many activities but usually they reports non-existent infections to scare you into thinking that your computer is infected and displays bogus notifications about supposedly detected spyware, keyloggers and other very dangerous malware.
Windows Security Alert
To help protect your computer, Windows Firewall has blocked some features of this program.
Do you want to keep blocking this program?
Zeus Trojan


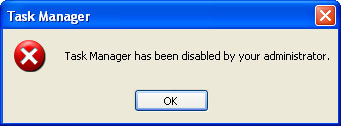
What is more, OpenCloud Security prevents victims from launching legitimate programs. For example, it will state that you can't run Task Manager because it's infected. If you can't use your web browser or and run your favorite malware scanner, you can activate the rogue program by entering this registration code: DB038748-B4659586-4A1071AF-32E768CD-36005B1B-F4520642-3000BF2A-04FC910B. Once this is done, you are free to install anti-malware software and remove the rogue anti-virus program from your computer properly.

Otherwise, you'll have to restart your computer in Safe Mode with Networking, disable a proxy server for your LAN connection and download malware removal tools to remove OpenCloud Security. You need to disable a proxy server for your LAN connection if you're in Normal Mode as well. To remove OpenCloud Security, please follow the removal steps in the removal guide below. If the first removal procedure doesn't work, try the alternate removal method. If you have any questions, pleas leave a comment below. And remember, do not purchase this rogue security product no matter what. Good luck and be safe online!

Related malware:

OpenCloud Security removal instructions:

1. Reboot your computer is "Safe Mode with Networking". As the computer is booting tap the "F8 key" continuously which should bring up the "Windows Advanced Options Menu" as shown below. Use your arrow keys to move to "Safe Mode with Networking" and press Enter key. Read more detailed instructions here: http://www.computerhope.com/issues/chsafe.htm
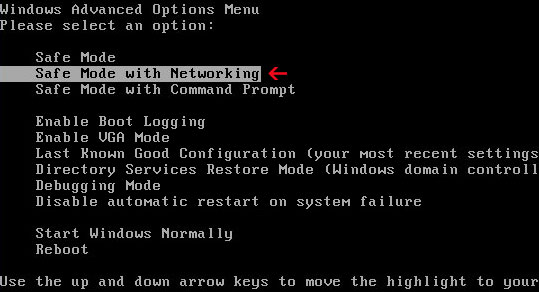

NOTE: Login as the same user you were previously logged in with in the normal Windows mode.

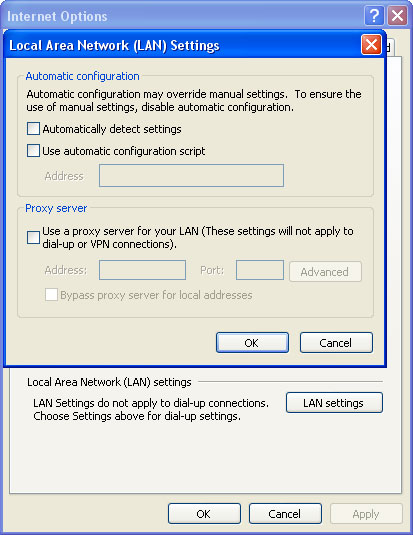
2. Launch Internet Explorer. In Internet Explorer go to: Tools→Internet Options→Connections tab. Click Lan Settings button and uncheck the checkbox labeled Use a proxy server for your LAN. Click OK. You may have to repeat steps 1-2 if you will have problems downloading malware removal programs.


3. Download free anti-malware software from the list below and run a full system scan.
NOTE: in some cases the rogue program may block anti-malware software. Before saving the selected program onto your computer, you may have to rename the installer to iexplore.exe or winlogon.exe With all of these tools, if running Windows 7 or Vista they MUST be run as Auto Infoistrator. Launch the program and follow the prompts. Don't forget to update the installed program before scanning.


Alternate OpenCloud Security removal instructions:

1. Go to Start → Run or press WinKey+R. Type in "command" and press Enter key.


2. In the command prompt window type "notepad". Notepad will come up.

3. Copy all the text in blue color below and paste into Notepad.

Windows Registry Editor Version 5.00
[HKEY_CLASSES_ROOT\exefile\shell\open\command]
@="\"%1\" %*"

4. Save file as regfix.reg to your Desktop. NOTE: (Save as type: All files)

regfix.reg is available for download here, in case you can't make your own or it doesn't work. 

5. Double-click on regfix.reg file to run it. Click "Yes" for Registry Editor prompt window. Then click OK.
6. Download free anti-malware software from the list below and run a full system scan.
NOTE: in some cases the rogue program may block anti-malware software. Before saving the selected program onto your computer, you may have to rename the installer to iexplore.exe, explorer.exe or winlogon.exe With all of these tools, if running Windows 7 or Vista they MUST be run as Auto Infoistrator. Launch the program and follow the prompts. Don't forget to update the installed program before scanning. 

7. New threats appear every day. In order to protect your PC from such (new) infections we strongly recommend you to use ESET Smart Security.

Associated OpenCloud Security files and registry values:

Files:

Windows XP:
  • C:\Documents and Settings\[UserName]\Application Data\OpenCloud Security\OpenCloud Security.exe
  • C:\Documents and Settings\[UserName]\Application Data\OpenCloud Security\csrss.exe
  • C:\Documents and Settings\[UserName]\Application Data\OpenCloud Security\wf.conf
  • C:\Documents and Settings\[UserName]\Application Data\OpenCloud Security\sysl32.dll
Windows Vista/7:
  • C:\Users\[UserName]\AppData\Roaming\OpenCloud Security\OpenCloud Security.exe
  • C:\Users\[UserName]\AppData\Roaming\OpenCloud Security\csrss.exe
  • C:\Users\[UserName]\AppData\Roaming\OpenCloud Security\wf.conf
  • C:\Users\[UserName]\AppData\Roaming\OpenCloud Security\sysl32.dll
Registry values:
  • HKEY_CURRENT_USER\Software\Microsoft\Windows NT\CurrentVersion\Windows "load"="%Temp%\csrss.exe"
Share this information with other people:

Friday, September 2, 2011

How to Remove Master Utilities (Uninstall Guide)

Master Utilities is a rogue system optimization and cleaning tool that overwhelms users with numerous fraudulent error warnings such as "Critical Hard Disk Drive Error", "RAM failure", or "Critical Error". It's probably the most common kind of malicious software nowadays. Because cyber crooks use social engineering to distribute fake programs this makes them very dangerous. In some cases, malware authors the advantages of bugs in popular software like Adobe Acrobat and Java and may install a backdoor Trojan on your computer which will then download Master Utilities to your computer. The rogue program will scan your computer for critical hard drive and Windows registry errors and report numerous problems that should be fix immediately, although they do not actually exist. It reports exactly the same problems on infected computers, no matter whether you use a laptop or a PC. It will also display fake system warnings about data corruption and loss, system errors and failures. In some cases Master Utilities will prevent you from opening certain programs on your computer, claiming that they are corrupted. If you encounter something like this or you think that your computer is infected with Master Utilities, please follow the steps in the removal guide below.


Fake Master Utilities warnings:


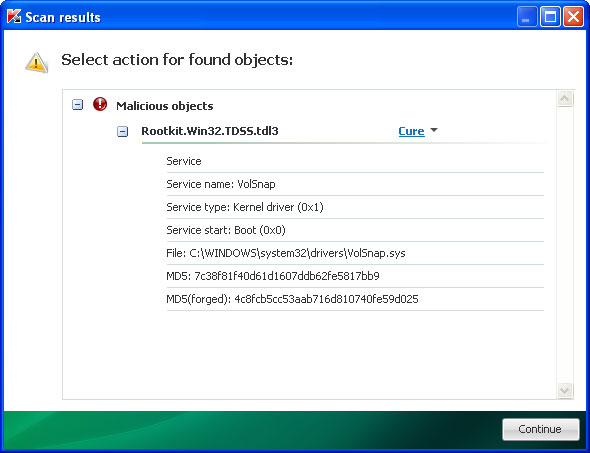
As you may know, the main goal of Master Utilities and similar scareware is to trick you into paying for a full version of the bogus program. It does absolutely nothing, so you shouldn't purchase it no matter what, keeping in mind that this malware is a gateway to identity theft. The bad news is that this rogue program drops a rootkit from the well known TDSS malware family and crash various programs in an effort to deceive you into believing a true problem exists. One more thing, it hides/moves certain applications and shortcuts to Windows Temp directory to make you think that your hard drive fails to load certain programs. Do not delete anything from Windows Temp folder; otherwise you'll encounter problems restoring program shortcuts and other files. There are several steps you can take to completely remove Master Utilities and associated malware from your computer. First of all, run TDSSKiller as described in the removal instructions below. You must remove rootkits before proceeding to the next steps. Otherwise, the rogue program will be re-downloaded. Then scan your computer with legitimate malware removal tools, Malwarebytes Antimalware, SUPERAntispyware and some other programs mentioned below.

Additionally, you can activate the rogue program by entering this registration code 1203978628012489708290478989147 and any email as shown in the image below.


Once this is done, you are free to install anti-malware software and remove the rogue anti-virus program from your computer properly. And remember, do not purchase Master Utilities. You can remove this malware manually as well. However, just the rogue program itself but not rootkits. For more information, please follow the alternate Master Utilities removal guide. Last, but not least, if you need help removing this scareware from your computer, please leave a comment below. Compute wisely!


Master Utilities removal instructions:

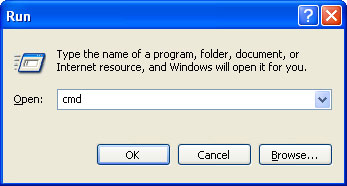
1. First of all, you need to unhide the files and folders. Select Run... from the Start Menu or just hit the key combination CTRL+R on your keyboard. In the Open: field, enter cmd and hit Enter or click OK.


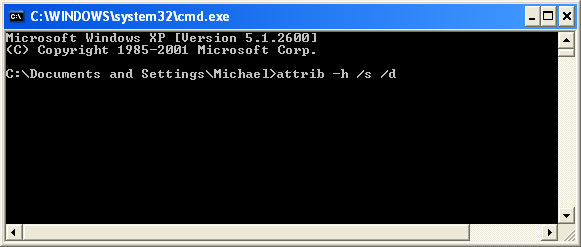
At the command prompt, enter attrib -h /s /d and hit Enter. Now, you should see all your files and folders. NOTE: you may have to repeat this step because the malware may hide your files again.


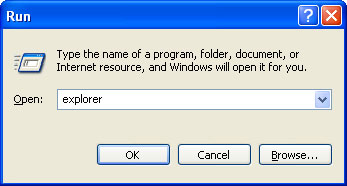
If you still can't see any of your files, Select Run... from the Start Menu or just hit the key combination CTRL+R on your keyboard. In the Open: field, enter explorer and hit Enter or click OK.


2. Open Internet Explorer. Select Run... from the Start Menu or just hit the key combination CTRL+R on your keyboard. In the Open: field, enter iexplore.exe and hit Enter or click OK.

Download free anti-malware software from the list below and run a full system scan.
NOTE: in some cases the rogue program may block anti-malware software. Before saving the selected program onto your computer, you may have to rename the installer to iexplore.exe or winlogon.exe With all of these tools, if running Windows 7 or Vista they MUST be run as Auto Infoistrator. Launch the program and follow the prompts. Don't forget to update the installed program before scanning.

3. Open Internet Explorer and download TDSSKiller or Backdoor.Tidserv Removal Tool. This malware usually (but not always) comes bundled with TDSS rootkit. Removing this rootkit from your computer is very important (if exists). Run TDSSKiller or Backdoor.Tidserv Removal Tool to remove the rootkit.


Alertane Master Utilities removal instructions:

1. First of all, you need to unhide the files and folders. Select Run... from the Start Menu or just hit the key combination CTRL+R on your keyboard. In the Open: field, enter cmd and hit Enter or click OK.


At the command prompt, enter attrib -h /s /d and hit Enter. Now, you should see all your files and folders. NOTE: you may have to repeat this step because the malware may hide your files again.


2. The rogue application places an icon or your desktop. Right click on the icon, click Properties in the drop-down menu, then click the Shortcut tab.


The location of the malware is in the Target box.


On computers running Windows XP, malware hides in:
C:\Documents and Settings\All Users\Application Data\

NOTE: by default, Application Data folder is hidden. Malware files are hidden as well. To see hidden files and folders, please read Show Hidden Files and Folders in Windows.

Under the Hidden files and folders section, click Show hidden files and folders, and remove the checkmark from the checkbox labeled:

- Hide extensions for known file types
- Hide protected operating system files

Click OK to save the changes. Now you will be able to see all files and folders in the Application Data directory.

On computers running Windows Vista/7, malware hides in:
C:\ProgramData\

3. Look for suspect ".exe" files in the given directories depending on the Windows version you have.

Example Windows XP:
C:\Documents and Settings\All Users\Application Data\Ka09I05RQNSXj2bq.exe
C:\Documents and Settings\All Users\Application Data\BdoeWKAqM.exe

Example Windows Vista/7:
C:\ProgramData\Ka09I05RQNSXj2bq.exe
C:\ProgramData\BdoeWKAqM.exe

Basically, there will be a couple of ".exe" file named with a series of numbers or letters.


Rename Ka09I05RQNSXj2bq.exe to Ka09I05RQNSXj2bq.vir as shown in the image below.


4. Restart your computer. The malware should be inactive after the restart.

5. Open Internet Explorer and download TDSSKiller or Backdoor.Tidserv Removal Tool. This malware usually (but not always) comes bundled with TDSS rootkit. Removing this rootkit from your computer is very important (if exists). Run TDSSKiller and remove the rootkit.


6. Download free anti-malware software from the list below and run a full system scan.
NOTE: in some cases the rogue program may block anti-malware software. Before saving the selected program onto your computer, you may have to rename the installer to iexplore.exe or winlogon.exe With all of these tools, if running Windows 7 or Vista they MUST be run as Auto Infoistrator. Launch the program and follow the prompts. Don't forget to update the installed program before scanning.

7. New threats appear every day. In order to protect your PC from such (new) infections we strongly recommend you to use ESET Smart Security.


Associated Master Utilities files and registry values:

Files:

Windows XP:
  • %AllUsersProfile%\Application Data\[SET OF RANDOM CHARACTERS]
  • %AllUsersProfile%\Application Data\[SET OF RANDOM CHARACTERS].exe
  • %UsersProfile%\Desktop\Master Utilities.lnk
  • %UsersProfile%\Start Menu\Programs\Master Utilities
  • %UsersProfile%\Start Menu\Programs\Master Utilities\Master Utilities.lnk
  • %UsersProfile%\Start Menu\Programs\Master Utilities\Uninstall Master Utilities.lnk
%AllUsersProfile% refers to: C:\Documents and Settings\All Users
%UserProfile% refers to: C:\Documents and Settings\[User Name]

Windows Vista/7:
  • %AllUsersProfile%\[SET OF RANDOM CHARACTERS]
  • %AllUsersProfile%\[SET OF RANDOM CHARACTERS].exe
  • %UsersProfile%\Desktop\Master Utilities.lnk
  • %UsersProfile%\Start Menu\Programs\Master Utilities\
  • %UsersProfile%\Start Menu\Programs\Master Utilities\Master Utilities.lnk
  • %UsersProfile%\Start Menu\Programs\Master Utilities\Uninstall Master Utilities.lnk
%AllUsersProfile% refers to: C:\ProgramData
%UserProfile% refers to: C:\Users\[User Name]

Registry values:
  • HKEY_CURRENT_USER\Software\Microsoft\Windows\CurrentVersion\Run "[SET OF RANDOM CHARACTERS].exe"
  • HKEY_CURRENT_USER\Software\Microsoft\Windows\CurrentVersion\Run "[SET OF RANDOM CHARACTERS]"
  • HKEY_CURRENT_USER\Software\Microsoft\Windows\CurrentVersion\Policies\Associations "LowRiskFileTypes" = '/{hq:/s`s:/ogn:/uyu:/dyd:/c`u:/bnl:/ble:/sdf:/lrh:/iul:/iulm:/fhg:/clq:/kqf:/`wh:/lqf:/lqdf:/lnw:/lq2:/l2t:/v`w:/rbs:'
  • HKEY_CURRENT_USER\Software\Microsoft\Windows\CurrentVersion\Policies\Attachments "SaveZoneInformation" = '1'
  • HKEY_CURRENT_USER\Software\Microsoft\Internet Explorer\Download "CheckExeSignatures" = 'no'
  • HKEY_CURRENT_USER\Software\Microsoft\Internet Explorer\Main "Use FormSuggest" = 'yes'
Share this information with other people:

Thursday, September 1, 2011

Remove Bandoo (Uninstall Guide)

Bandoo is a free add-on that enriches your chat conversations and email messages. It supports MSN messenger, Gmail, Facebook and some other popular instant messaging applications and web services. The whole idea of Bandoo is to give people new ways to express themselves using emoticons, nudges, winks, and funny images. It's not a virus or spyware. Just a fun tool to have, no Trojans, adware or other malicious software. Although, Bandoo has a very well written FAQ section, some people just can't find a way to completely uninstall Bandoo from their computers. Very often, is not the Bandoo itself, but Bandoo web browser add-ons and other components. For example, one of our readers said that Bandoo came bundled with Searchqu toolbar and although, he removed the program, Searchqu toolbar was still active in both web browsers, IE and Firefox. We have to admit that this is a very common problem. I don't know whether the authors of Bandoo leave the Searchqu toolbar uninstalled intentionally or not. But that's really annoying. To remove Bandoo and related add-ons from your computer, please follow the removal instructions below. Your questions, comments are welcome. Good luck and be safe online!


Bandoo removal instructions:

1. Go to the Start Menu. Select Control Panel → Add/Remove Programs.
If you are using Windows Vista or Windows 7, select Control Panel → Uninstall a Program.


2. Search for Bandoo in the list. Select the program and click Remove button.
If you are using Windows Vista/7, click Uninstall up near the top of that window.


3. Click Just uninstall Bandoo to remove it from the computer.


Remove Bandoo/Searchqu in Internet Explorer:

1. Open Internet Explorer. Go to Tools → Manage Add-ons.


2. Select Toolbars and Extensions. Uninstall everything related to Bandoo Media and Searhqu. from the list: MediaBar, UrlHelper Class, etc.


3. Select Search Providers. First of all, choose Bing search engine and make it your default search provider. Then select Web Search and click Remove button to uninstall it (lower right corner of the window).


Remove Bandoo/Searchqu in Mozilla Firefox:

1. Open Mozilla Firefox. Go to Tools → Add-ons.


2. Select Extensions. Choose DataMngr and Bandoo for Firefox and click Uninstall button.


3. Click the small magnifier icon at the right top corner as shown in the image below. Select Manage Search Engines... from the list.


4. Select Web Search and click Remove button. Click OK to save the changes.


Remove Bandoo/Searchqu in Google Chrome:

1. Click on Customize and control Google Chrome icon and select Options.


2. Choose Basic Options. Change Google Chrome homepage to google.com or any other and click the Manage search engines... button.


3. Select Google from the list and make it your default search engine.


4. Select Web Search from the list remove it by clicking the "X" mark as shown in the image below. That's it.


Associated Bandoo files and registry values:

Files:
  • C:\Program Files\Bandoo\Plugins
  • C:\Program Files\Bandoo\Resources
  • C:\Program Files\Bandoo\Bandoo.exe
  • C:\Program Files\Bandoo\BandooGo.exe
  • C:\Program Files\Bandoo\BandooRes.dll
  • C:\Program Files\Bandoo\BandooUI.exe
  • C:\Program Files\Bandoo\BndCore.exe
  • C:\Program Files\Bandoo\BndHook.dll
  • C:\Program Files\Bandoo\ChromePackage.crx
  • C:\Program Files\Bandoo\CrashRpt.dll
  • C:\Program Files\Bandoo\ExtensionsManager.exe
  • C:\Program Files\Bandoo\ffext.exe
  • C:\Program Files\Bandoo\FlashAnimator.dll
  • C:\Program Files\Bandoo\ftalk.ico
  • C:\Program Files\Bandoo\GIFAnimator.dll
  • C:\Program Files\Bandoo\InstallerNsisHelper.dll
  • C:\Program Files\Bandoo\libungif4.dll
  • C:\Program Files\Bandoo\license.rtf
  • C:\Program Files\Bandoo\Plugins.ini
  • C:\Program Files\Bandoo\uninstaller.exe
  • C:\Documents and Settings\All Users\Start Menu\Programs\Bandoo\Bandoo Extensions
  • C:\Documents and Settings\All Users\Start Menu\Programs\Bandoo\Bandoo Tutorial
  • C:\Documents and Settings\All Users\Start Menu\Programs\Bandoo\License Agreement
Registry values:
  • HKEY_CLASSES_ROOT\AppID\BandooCore.EXE
  • HKEY_CLASSES_ROOT\BandooCoordinator.BandooCoordinator
  • HKEY_CLASSES_ROOT\BandooCoordinator.PlugInNotifier
  • HKEY_CLASSES_ROOT\BandooCore.BandooCore
  • HKEY_CLASSES_ROOT\BandooCore.ResourcesMngr
  • HKEY_CLASSES_ROOT\BandooIEPlugin.BandooIEPlugin
  • HKEY_CURRENT_USER\Software\Mozilla\Firefox\Extensions "ffox@bandoo.com"
  • HKEY_LOCAL_MACHINE\SOFTWARE\Bandoo
  • HKEY_LOCAL_MACHINE\SOFTWARE\Classes\AppID\BandooCoordinator.EXE
  • HKEY_LOCAL_MACHINE\SOFTWARE\Classes\AppID\BandooCore.EXE
  • HKEY_LOCAL_MACHINE\SOFTWARE\Classes\BandooCoordinator.BandooCoordinator
  • HKEY_LOCAL_MACHINE\SOFTWARE\Classes\BandooCoordinator.PlugInNotifier
  • HKEY_LOCAL_MACHINE\SOFTWARE\Classes\BandooCore.BandooCore
  • HKEY_LOCAL_MACHINE\SOFTWARE\Classes\BandooCore.SettingsMngr
  • HKEY_LOCAL_MACHINE\SOFTWARE\Classes\BandooIEPlugin.BandooIEPlugin
  • HKEY_LOCAL_MACHINE\SOFTWARE\Microsoft\Windows\CurrentVersion\Uninstall\Bandoo
  • HKEY_LOCAL_MACHINE\SYSTEM\ControlSet001\Services\Bandoo Coordinator
Share this information with your friends:

Wednesday, August 31, 2011

Remove iMesh Toolbar and iMesh search bar (Uninstall Guide)

iMesh is probably one of the oldest peer-to-peer file sharing network/software in the world. I'm sure most of you have heard about this software. Before taking a closer look at this P2P software, I think it's worth mentioning that iMesh is not a virus or any other type of malicious software that can infect your machine. However, some people find it difficult to completely remove iMesh from from their computers. Although, iMeshc can be easily uninstalled via Control Panel → Add/Remove (Uninstall), iMesh Toolbar and iMesh search bar must be removed separately. So, when you uninstall iMesh, you also have to uninstall a program called MediaBar. And that's not all, you have to restore your previous homepage and uninstall search provider(search.imesh.com) manually as well. Sounds qquite complicated. Besides, re-installing your web browser probably won't help either. And one last thing, it may add Emoticons for your messenger! icon/shortcut to your Desktop. If you don't know how to remove iMesh Toolbar and iMesh search bar, please follow the steps in the removal guide below. And if you need help removing it, please leave a comment below or just email us. Good luck and be safe online!


iMesh Toolbar and iMesh search bar removal instructions:

1. Go to the Start Menu. Select Control Panel → Add/Remove Programs.
If you are using Windows Vista or Windows 7, select Control Panel → Uninstall a Program.


2. Search for MediaBar in the list. Select the program and click Remove button.
If you are using Windows Vista/7, click Uninstall up near the top of that window.


Remove iMesh Toolbar and iMesh search bar in Internet Explorer:

1. Open Internet Explorer. Go to Tools → Manage Add-ons.


2. Select Toolbars and Extensions. Uninstall everything related to iMesh Inc. from the list: MediaBar, UrlHelper Class, etc.


3. Select Search Providers. First of all, choose Bing search engine and make it your default search provider. Then select Web Search and click Remove button to uninstall it (lower right corner of the window).


4. Go to Tools → Internet Options. Select General tab and click Use default button or enter your own website, e.g. gooog.com instead of search.imesh.com. Click OK to save the changes. And that's it.


Remove iMesh Toolbar and iMesh search bar in Mozilla Firefox:

1. Open Mozilla Firefox. Go to Tools → Add-ons.


2. Select Extensions. Choose DataMngr and MediaBar and click Uninstall button.


3. Click the small magnifier icon at the right top corner as shown in the image below. Select Manage Search Engines... from the list.


4. Select Web Search and click Remove button. Click OK to save the changes.


5. Go to Tools → Options. Under the General tab reset the startup homepage. That's it.


Remove iMesh Toolbar and iMesh search bar in Google Chrome:

1. Click on Customize and control Google Chrome icon and select Options.


2. Change Google Chrome homepage to google.com or any other.


3. Click the Manage search engines... button.


4. Make google.com your default search engine shown in the image below.


5. Select Web Search from the list remove it by clicking the "X" mark as shown in the image below.


Associated Facemoods files and registry values:

Files:
  • C:\Program Files\iMesh Applications\MediaBar\
  • C:\Program Files\iMesh Applications\MediaBar\uninstall.exe
  • C:\Program Files\iMesh Applications\MediaBar\Datamngr\datamngr.dll
  • C:\Program Files\iMesh Applications\MediaBar\Datamngr\datamngrUI.exe
  • C:\Program Files\iMesh Applications\MediaBar\Datamngr\IEBHO.dll
  • C:\Program Files\iMesh Applications\MediaBar\Datamngr\FirefoxExtension\chrome.manifest
  • C:\Program Files\iMesh Applications\MediaBar\Datamngr\FirefoxExtension\chrome.manifest.alt
  • C:\Program Files\iMesh Applications\MediaBar\Datamngr\FirefoxExtension\install.rdf
  • C:\Program Files\iMesh Applications\MediaBar\Datamngr\FirefoxExtension\install.rdf.alt
  • C:\Program Files\iMesh Applications\MediaBar\Datamngr\FirefoxExtension\components\DataMngrHlp.dll
  • C:\Program Files\iMesh Applications\MediaBar\Datamngr\FirefoxExtension\components\DataMngrHlp.xpt
  • C:\Program Files\iMesh Applications\MediaBar\Datamngr\FirefoxExtension\components\DataMngrHlpFF3.dll
  • C:\Program Files\iMesh Applications\MediaBar\Datamngr\FirefoxExtension\content\DnsBHO.js
  • C:\Program Files\iMesh Applications\MediaBar\Datamngr\FirefoxExtension\content\Error404BHO.js
  • C:\Program Files\iMesh Applications\MediaBar\Datamngr\FirefoxExtension\content\NewTabBHO.js
  • C:\Program Files\iMesh Applications\MediaBar\Datamngr\FirefoxExtension\content\overlay.js
  • C:\Program Files\iMesh Applications\MediaBar\Datamngr\FirefoxExtension\content\overlay.xul
  • C:\Program Files\iMesh Applications\MediaBar\Datamngr\FirefoxExtension\content\RelatedSearch.js
  • C:\Program Files\iMesh Applications\MediaBar\Datamngr\FirefoxExtension\content\SearchBHO.js
  • C:\Program Files\iMesh Applications\MediaBar\Datamngr\FirefoxExtension\content\SettingManager.js
  • C:\Program Files\iMesh Applications\MediaBar\Datamngr\FirefoxExtension\content\Settings.xml
  • C:\Program Files\iMesh Applications\MediaBar\Datamngr\FirefoxExtension\content\Settings.xml.alt
  • C:\Program Files\iMesh Applications\MediaBar\Datamngr\ToolBar\chrome
  • C:\Program Files\iMesh Applications\MediaBar\Datamngr\ToolBar\as_guid.dat
  • C:\Program Files\iMesh Applications\MediaBar\Datamngr\ToolBar\dtUser.exe
  • C:\Program Files\iMesh Applications\MediaBar\Datamngr\ToolBar\imeshbandmltbpi.dll
  • C:\Program Files\iMesh Applications\MediaBar\Datamngr\ToolBar\imeshdtxmltbpi.dll
  • C:\Program Files\iMesh Applications\MediaBar\Datamngr\ToolBar\manifest.xml
  • C:\Program Files\iMesh Applications\MediaBar\Datamngr\ToolBar\uninstall.exe
  • C:\Program Files\iMesh Applications\MediaBar\Datamngr\ToolBar\components\windowmediator.js
Registry values:
  • HKEY_CURRENT_USER\Software\DataMngr
  • HKEY_CURRENT_USER\Software\mediabarim
  • HKEY_LOCAL_MACHINE\SOFTWARE\DataMngr
  • HKEY_LOCAL_MACHINE\SOFTWARE\iMeshMediabarTb
  • HKEY_LOCAL_MACHINE\SOFTWARE\Microsoft\Internet Explorer\Toolbar
  • HKEY_LOCAL_MACHINE\SOFTWARE\Microsoft\Windows\CurrentVersion\App Management\ARPCache\iMesh 1 MediaBar
  • HKEY_LOCAL_MACHINE\SOFTWARE\Microsoft\Windows\CurrentVersion\Run "DATAMNGR"
  • HKEY_LOCAL_MACHINE\SOFTWARE\Microsoft\Windows\CurrentVersion\Uninstall\iMesh 1 MediaBar
Share this information with your friends: